Dirt, pollen, bird droppings, and salt air, Florida panels take a beating. Over time, even a thin layer of grime can reduce your solar panel output by 15–25%, which means higher electricity bills and a longer payback period on your investment. Knowing how to clean solar panels the right way protects that investment and keeps your system producing at full capacity.
At Advance Solar & Spa, we’ve installed and maintained over 50,000 solar energy systems across Florida since 1983. Our service team sees firsthand what happens when panels go neglected, and what a proper cleaning routine can do to restore performance. That hands-on experience is exactly what shaped this guide. We want you to get the most energy out of every panel on your roof, whether we installed it or someone else did.
Below, you’ll find a complete walkthrough covering the tools you actually need, safe cleaning solutions (no, you don’t need expensive specialty products), step-by-step instructions, and critical safety precautions for working on your roof. We’ll also cover when it makes sense to call a professional instead of grabbing a ladder yourself. Let’s get your panels back to peak production.
When solar panels need cleaning
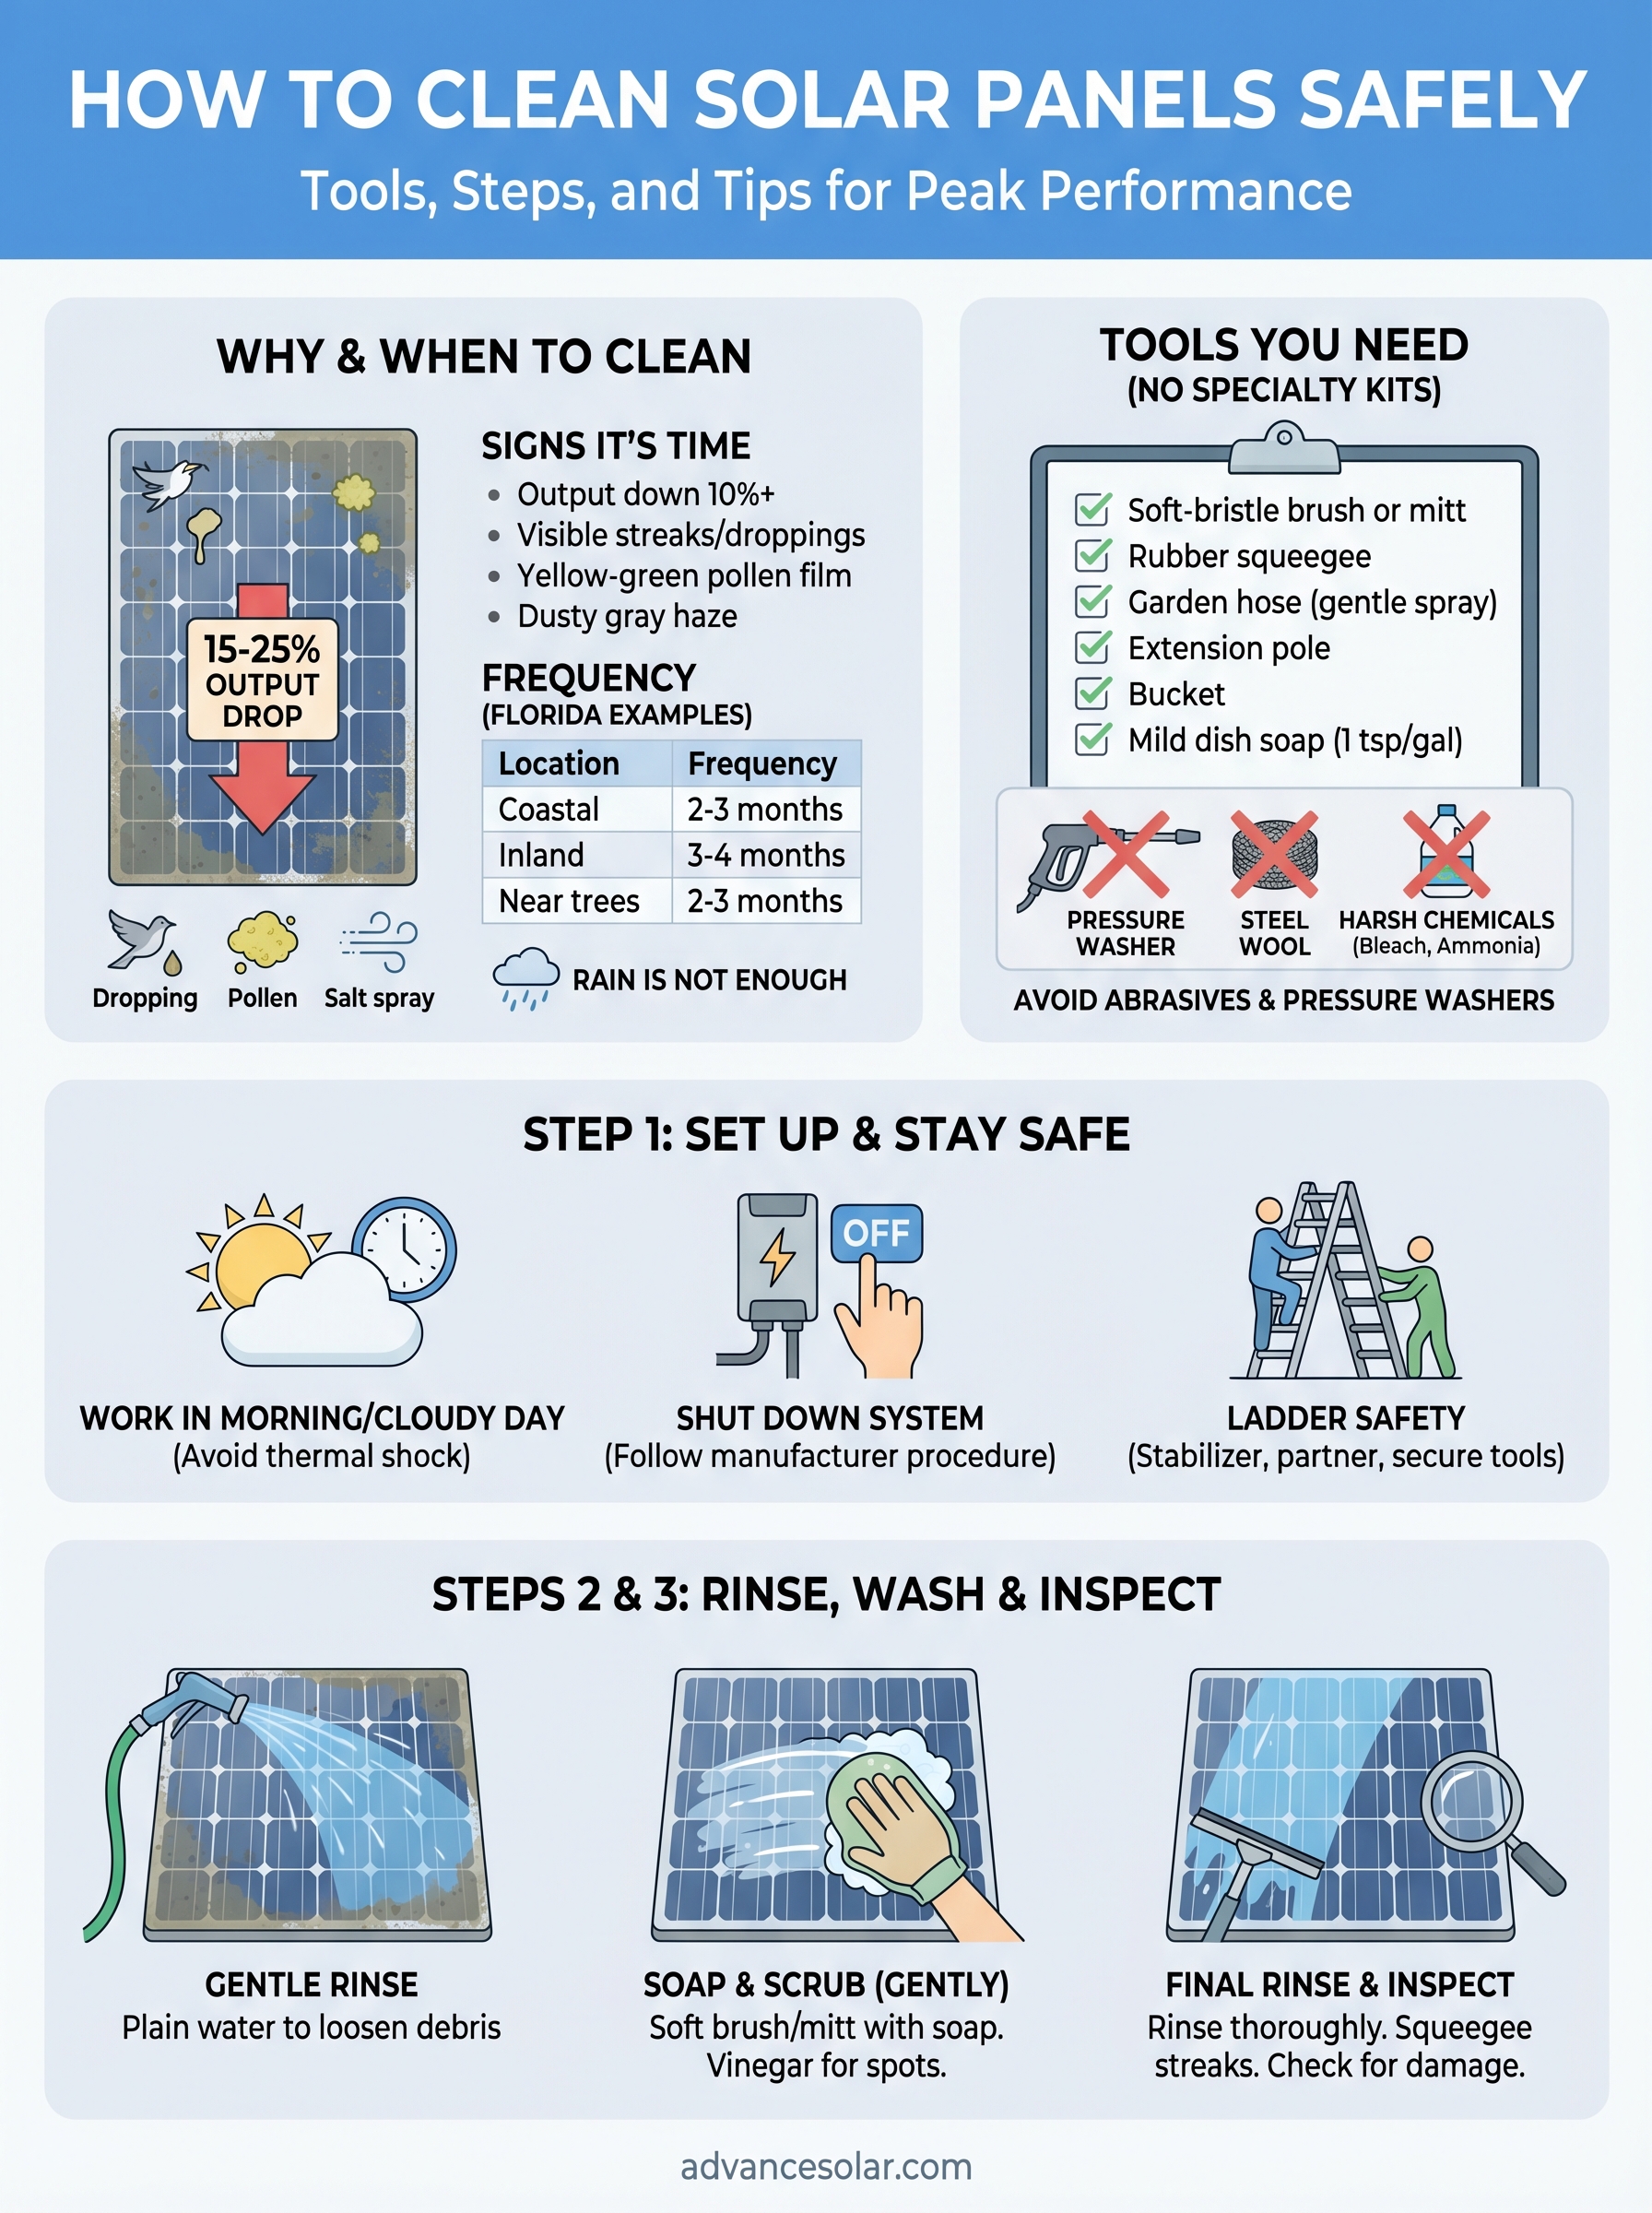
Knowing when to clean is just as important as knowing how to clean solar panels correctly. Cleaning too rarely lets grime compound, reducing your output over months without you noticing the gradual drop. Clean too often and you waste time, increase the chance of accidental scratches, and add unnecessary wear to your system. The right schedule depends on your location, your roof’s pitch, nearby trees, and what type of debris regularly lands on your array.
Signs your panels need cleaning now
Your monitoring app is the fastest way to catch a problem. Most inverters, including Enphase and Tesla Energy systems, give you real-time production data you can check from your phone. If your system is producing noticeably less than it did on a similar sunny day a few weeks ago, and nothing has changed with the weather, dirty panels are likely the cause. A drop of 10% or more in daily output on a clear day is a strong signal it’s time for a cleaning.
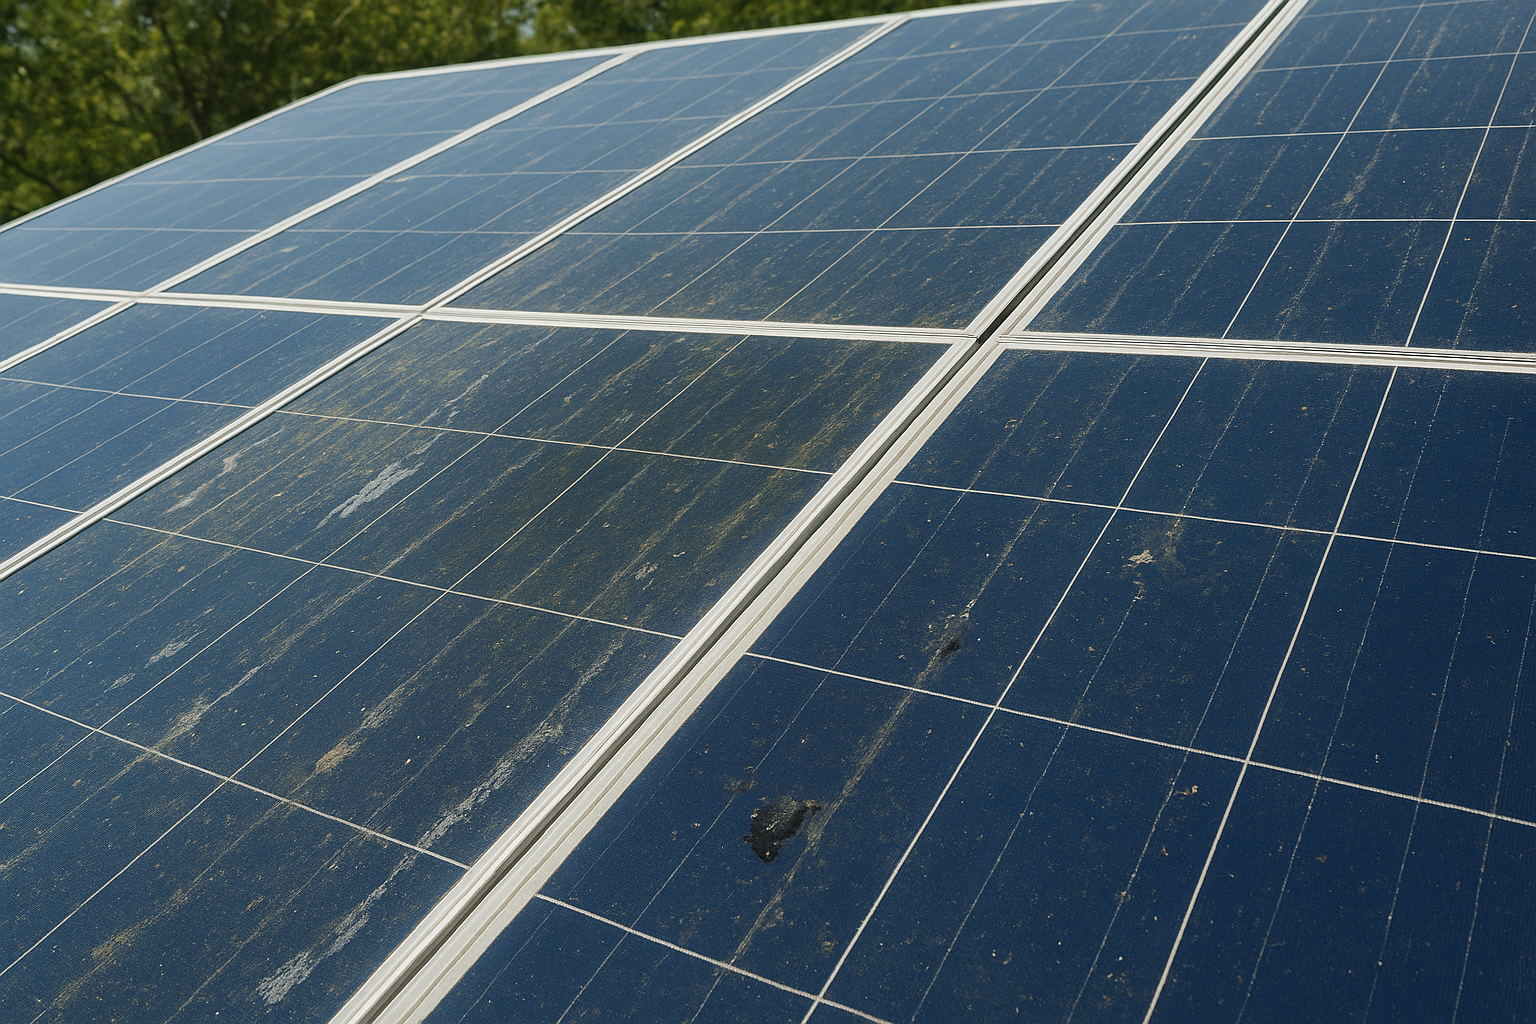
Beyond the numbers, do a visual check from the ground. Look for:
- White calcium streaks left behind after hard water evaporates
- Dark smears or splatters from bird droppings
- Yellow-green film from pollen accumulation during spring
- Dusty gray haze that dulls the entire panel surface
- Leaf debris or organic matter sitting in the frame channels along the edges
A single bird dropping covering even a small cluster of cells can reduce that panel’s output by a disproportionate amount because of how string inverters manage production across a series circuit.
How often to clean in Florida
Florida’s climate creates specific cleaning pressures that homeowners in other states don’t face. Coastal properties near Fort Myers, Naples, and Fort Lauderdale deal with salt air that deposits a fine mineral film on panel surfaces within weeks of a cleaning. Inland properties face heavy pollen loads from February through April, which can coat an entire array in just a few days during peak season.
A practical cleaning schedule for most Florida homeowners:
| Situation | Recommended Cleaning Frequency |
|---|---|
| Coastal property within 5 miles of the ocean | Every 2 to 3 months |
| Inland suburban property | Every 3 to 4 months |
| Property near large trees or open fields | Every 2 to 3 months |
| After a major storm or wildfire smoke event | Within 1 to 2 weeks |
Summer rainstorms do rinse off loose surface dust, but rain alone does not remove dried-on residue like bird droppings, pollen film, or salt deposits. After heavy rain, check your production data before assuming the panels are clean. Counting on rainfall as your primary cleaning method will quietly cost you energy output every single month.
What you need before you start
Gathering the right gear before you climb on your roof saves you multiple trips up and down the ladder and prevents improvised choices that can scratch your panels. Learning how to clean solar panels properly starts on the ground, not on the roof. You don’t need specialty solar cleaning kits sold online for $80 or more. Most of what you need is already in your garage or available at any hardware store for under $30 total.
Cleaning tools
Your goal is to remove debris without scratching the anti-reflective coating on the panel glass. Abrasive materials like steel wool, rough sponges, or stiff-bristle scrub brushes will permanently damage that coating and reduce your panel’s output going forward. Stick to the tools listed below:
- Soft-bristle brush or microfiber wash mitt for applying soapy water across the panel surface
- Rubber squeegee with a soft wiper blade for a streak-free finish
- Garden hose with a gentle spray nozzle (skip the pressure washer entirely)
- Extension pole rated for rooftop work if you plan to clean from the ground
- Bucket for mixing your cleaning solution
Never use a pressure washer on solar panels. The high-pressure stream can crack the glass, force water into the junction box, and void your manufacturer warranty in a single pass.
Safe cleaning solutions
Plain water handles most routine surface dirt, but for dried bird droppings or mineral deposits, a mild dish soap solution works well. Mix one teaspoon of gentle, non-abrasive dish soap per gallon of water. White vinegar diluted 50/50 with water is a solid option for breaking down hard water calcium streaks left behind on coastal properties.
Avoid anything that contains ammonia, bleach, or strong chemical solvents. These products degrade the panel’s protective glass coating over time and leave a residue that attracts more grime between each cleaning.
Step 1. Set up and stay safe
Before you rinse a single panel, two preparation steps protect both you and your equipment: shutting down your solar system and choosing the right time of day to work. Skipping either one is where most DIY cleaning mistakes happen, and both are easy to get right when you plan ahead.
Work in the morning or on a cloudy day
Cleaning hot panels is the single biggest mistake homeowners make when figuring out how to clean solar panels for the first time. When the glass is hot from direct afternoon sun, cold water hits the surface and causes rapid thermal contraction. Over repeated cycles, this stresses the glass and can create micro-cracks that quietly degrade performance over time. Schedule your cleaning for early morning, when panels are still cool and any residual dew helps loosen surface dust before you even apply a drop of soapy water.
Morning cleaning also gives your panels the rest of the day to dry completely and return to full production before peak afternoon sun hours.
Shut down your system and set up safely on the roof
Most inverter manufacturers recommend shutting down your solar system before any cleaning or maintenance work. For Enphase systems, use the Installer Toolkit app or your combiner box to power down. For Tesla Energy systems, follow the shutdown procedure outlined in your Gateway manual. This step removes any electrical risk while you work with water near the array.
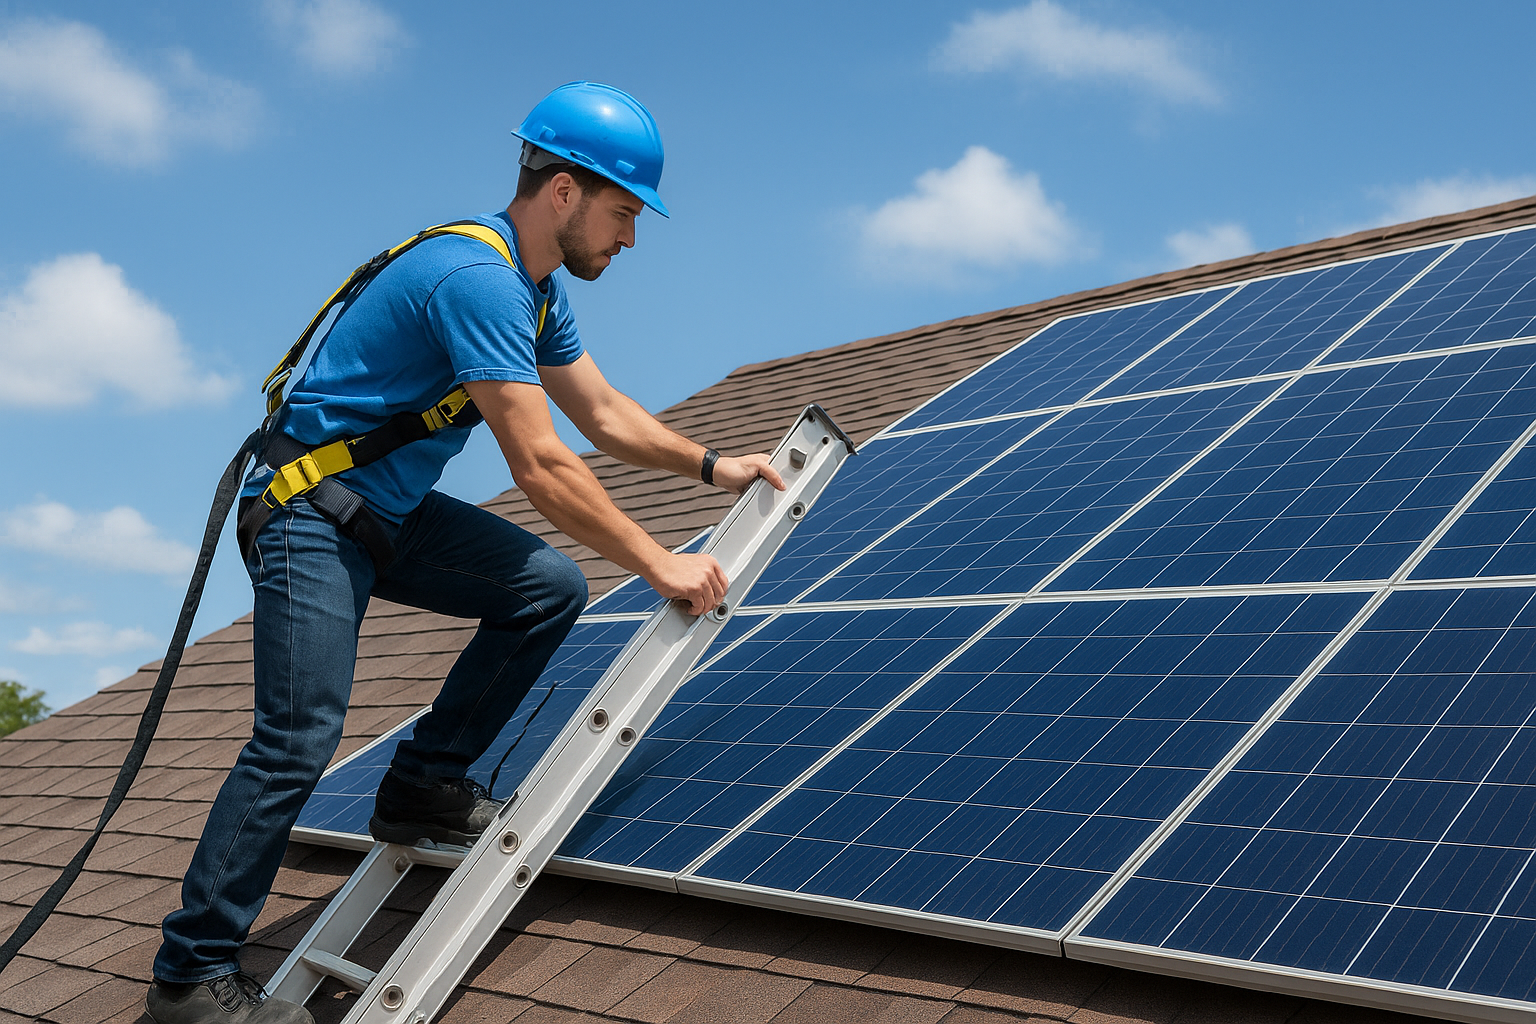
Once the system is fully powered down, set up your ladder on stable, level ground. Follow these safety steps before you step onto your roof:
- Use a ladder stabilizer to keep the ladder from shifting against the roofline
- Wear rubber-soled shoes with strong grip for tile or shingle surfaces
- Work with a partner who can steady the ladder and hand up your tools
- Tether all tools or keep them in a bucket so nothing slides off the roof
Step 2. Rinse and gently wash
With your system powered down and your tools ready, this is where the actual cleaning work happens. The goal is to loosen and lift grime without scrubbing aggressively, which is easier than it sounds once you follow the correct order of operations. Rushing this step or reversing the sequence is the most common reason people accidentally scratch their panels while learning how to clean solar panels for the first time.
Start with a plain water rinse
Before you apply any soap, wet the entire panel surface with your garden hose on a gentle spray setting. This first rinse softens dried-on material and flushes away loose dust, pollen, and debris sitting on top of the glass. Starting with a rinse means your brush or mitt makes contact with a lubricated surface instead of dragging dry particles across the coating.
Never spray water directly at the edges of the panel where the glass meets the frame, since forcing water into those gaps can cause moisture problems inside the junction box over time.
Work from the top of the panel toward the bottom so loose debris flows down and off the surface rather than back across areas you already rinsed. Give stubborn bird droppings a few seconds of steady water flow to soften before you touch them with your brush.
Apply your soap solution and scrub gently
Dip your soft-bristle brush or microfiber mitt into your diluted dish soap solution and work in overlapping horizontal strokes from the top edge down. Apply light, even pressure across the full surface. You are not trying to scrub through the grime with force; the soap does the chemical work while the brush simply lifts the loosened material away from the glass. For calcium streaks or stubborn dried deposits, apply your diluted white vinegar solution directly to the spot, let it sit for 30 seconds, then go back over it gently with your mitt before moving on.
Step 3. Final rinse and quick inspection
The last step in learning how to clean solar panels properly is the one most people rush through or skip entirely. A thorough final rinse removes soap residue that, if left to dry on the glass, creates a thin film that attracts new dust and pollen faster than a clean, untreated surface would. Take an extra two to three minutes here and your cleaning results will last noticeably longer between sessions.
Remove all soap and check for streaks
Rinse the entire panel surface one more time using your garden hose on a gentle spray setting, starting at the top and working downward in the same direction as your wash strokes. Keep the spray moving steadily rather than holding it on one spot. Once the water runs clear off the bottom edge with no soap bubbles visible, the panel is clean.
If you see streaks remaining after the rinse, run your squeegee from top to bottom in a single firm stroke to pull residual water off the glass before it evaporates and leaves mineral marks behind.
After squeegeeing, step back and look at the panel surface from a slight angle in the available light. Streaks or missed spots show up clearly when you view the glass at a low angle rather than straight on. If you catch a problem now, a quick second pass with your damp mitt and another rinse fixes it before you pack up your gear.
What to look for during your inspection
Once the panels are dry, use this moment to check the physical condition of each panel while you have a clear view from the roof. Run your eyes across the frame edges, the glass surface, and the wiring connections visible along the mounting rails.
Look for these specific issues:
- Cracked or chipped glass anywhere on the panel surface
- Discolored cells showing yellow or brown patches beneath the glass
- Loose or corroded wiring connections along the rail mounts
- Bent or separated frame edges that may allow water intrusion
Flag anything unusual and contact your installer for a professional assessment before the issue affects production or creates a safety concern. Catching physical damage early prevents small problems from becoming expensive repairs down the road.
Keep your panels producing
Now you know how to clean solar panels safely, from gathering the right tools to doing a post-cleaning inspection while you are still on the roof. Stick to a consistent schedule based on your property’s location, watch your monitoring app for unexpected production drops, and address bird droppings or heavy pollen buildup as soon as you spot them rather than waiting for your next scheduled session. Small, regular cleanings outperform infrequent deep scrubs every time.
Some situations call for a professional rather than a DIY approach. If your roof pitch is steep, your system has ground-fault issues, or your inspection turns up cracked glass or corroded wiring, leave the work to a licensed technician who can service the system safely and correctly. The team at Advance Solar & Spa has handled solar maintenance across Florida for over 40 years and can keep your system running at full output year-round.