Understanding how solar panel installation works gives you a real advantage before you sign any contract or put money down. Most homeowners know solar panels go on the roof and produce electricity, but the actual process from first phone call to flipping the switch involves engineering, permits, electrical work, and inspections that aren’t always obvious. Knowing what to expect at each stage helps you ask better questions and avoid costly surprises.
At Advance Solar & Spa, we’ve completed over 50,000 solar installations across Florida since 1983. Every system our in-house team designs and installs follows the same core process, site evaluation, system design, permitting, installation, inspection, and activation. We’ve refined that process over four decades, and we’re pulling back the curtain on it here because informed customers make confident decisions.
This guide breaks down each phase of a residential solar installation, from the initial energy assessment through final grid connection. You’ll learn what happens on your roof, inside your electrical panel, and behind the scenes with your utility company, so by the end, you’ll have a clear picture of the full timeline and know exactly what each step involves.
Why understanding the install process matters
Most homeowners spend more time researching a new refrigerator than they do a solar system that costs $20,000 or more. That knowledge gap creates real problems. When you don’t know how solar panel installation works, you can’t evaluate whether a contractor’s proposal is complete, whether their timeline is realistic, or whether the price you’re quoted reflects the actual scope of work. Knowing the process from start to finish shifts the power dynamic in your favor before a single panel ever goes on your roof.
You can spot red flags before you sign
A contractor who skips the site assessment or delivers a system design without visiting your property is cutting corners that will surface later. Reputable installers always evaluate your roof condition, shading patterns, roof orientation, and existing electrical panel before finalizing any proposal. If someone sends you a quote based only on your address and your average utility bill, treat that as a warning sign worth taking seriously.
A thorough proposal should always include a site-specific system design, projected annual energy production numbers, and a clear line-item breakdown of equipment, labor, and permit costs.
Verbal promises about performance or savings that don’t appear in writing are another concern. When you understand what a complete installation process includes, you know exactly what to look for in a proposal and which questions to push on if something is missing. This protects you from signing a contract that leaves critical details vague or open-ended.
You set realistic expectations for your timeline and budget
Solar installations in Florida typically take four to twelve weeks from contract signing to activation, and most of that time has nothing to do with work on your roof. Permitting, utility interconnection applications, and inspection scheduling are the longest phases of the process, and they vary significantly by county and utility provider. If a salesperson tells you your system will be live in two weeks, that claim is almost never accurate.
Understanding the timeline also matters if you’re planning around incentives. The federal solar tax credit lets you deduct 30% of your system cost from your federal taxes, but your system must be installed and operational within the tax year to claim it. If you’re counting on that credit for a specific filing year, you need to start the process early enough to clear permitting and inspections before December 31. Waiting until fall to sign a contract is a common mistake that pushes activation into the following year.
Budget clarity is the other major benefit. A lower quote that excludes permit fees, electrical panel upgrades, or system monitoring hardware isn’t actually cheaper once you account for everything required to get a system running legally and safely. Comparing proposals on equal footing requires you to know what each phase of the process costs and why. When you understand the full scope, you can evaluate bids based on total value rather than chasing the lowest number on a page. That knowledge alone can save you from a contractor relationship you’ll regret six months into a system that underperforms or sits idle waiting on a permit no one filed correctly.
How solar panels produce power for your home
Solar panels generate electricity through a process called the photovoltaic effect. Each panel contains silicon solar cells that absorb sunlight and knock electrons loose, creating a flow of direct current (DC) electricity. The more sunlight hits the cells, the more electricity flows. Florida’s intense sun and high number of annual sunshine hours make this process especially productive compared to most other states.
From DC to AC: what your inverter does
Your home runs on alternating current (AC), not the DC electricity your panels produce. That’s where your inverter comes in. The inverter converts the DC output from your panels into AC power your appliances, lighting, and HVAC system can use. Most modern residential systems use either a string inverter (one central unit for the whole array) or microinverters (individual units mounted behind each panel). Microinverters, like those made by Enphase, optimize each panel independently, so shading on one panel doesn’t drag down output from the rest.
Choosing the right inverter type for your roof layout and shading conditions can meaningfully affect how much usable electricity your system produces each year.
String inverters typically cost less upfront, but microinverters tend to perform better on roofs with complex angles or partial shading. This distinction is one reason knowing how solar panel installation works matters before you commit to a system design, because the inverter choice affects both daily performance and long-term reliability.
How excess power flows back to the grid
When your panels produce more electricity than your home needs, that surplus flows back to the utility grid through your meter. Your utility company tracks this through a billing arrangement called net metering. In Florida, net metering credits you for the power you export, which offsets charges on days when your panels produce less than your home consumes, such as cloudy days or high-consumption evenings.
Battery storage changes this equation. Systems using Tesla Powerwall or Enphase storage capture your surplus locally instead of sending it to the grid, giving you backup power during outages rather than relying on utility credits that policy changes could reduce in the future. Understanding how your system interacts with the grid helps you decide whether battery storage makes financial and practical sense for your household.
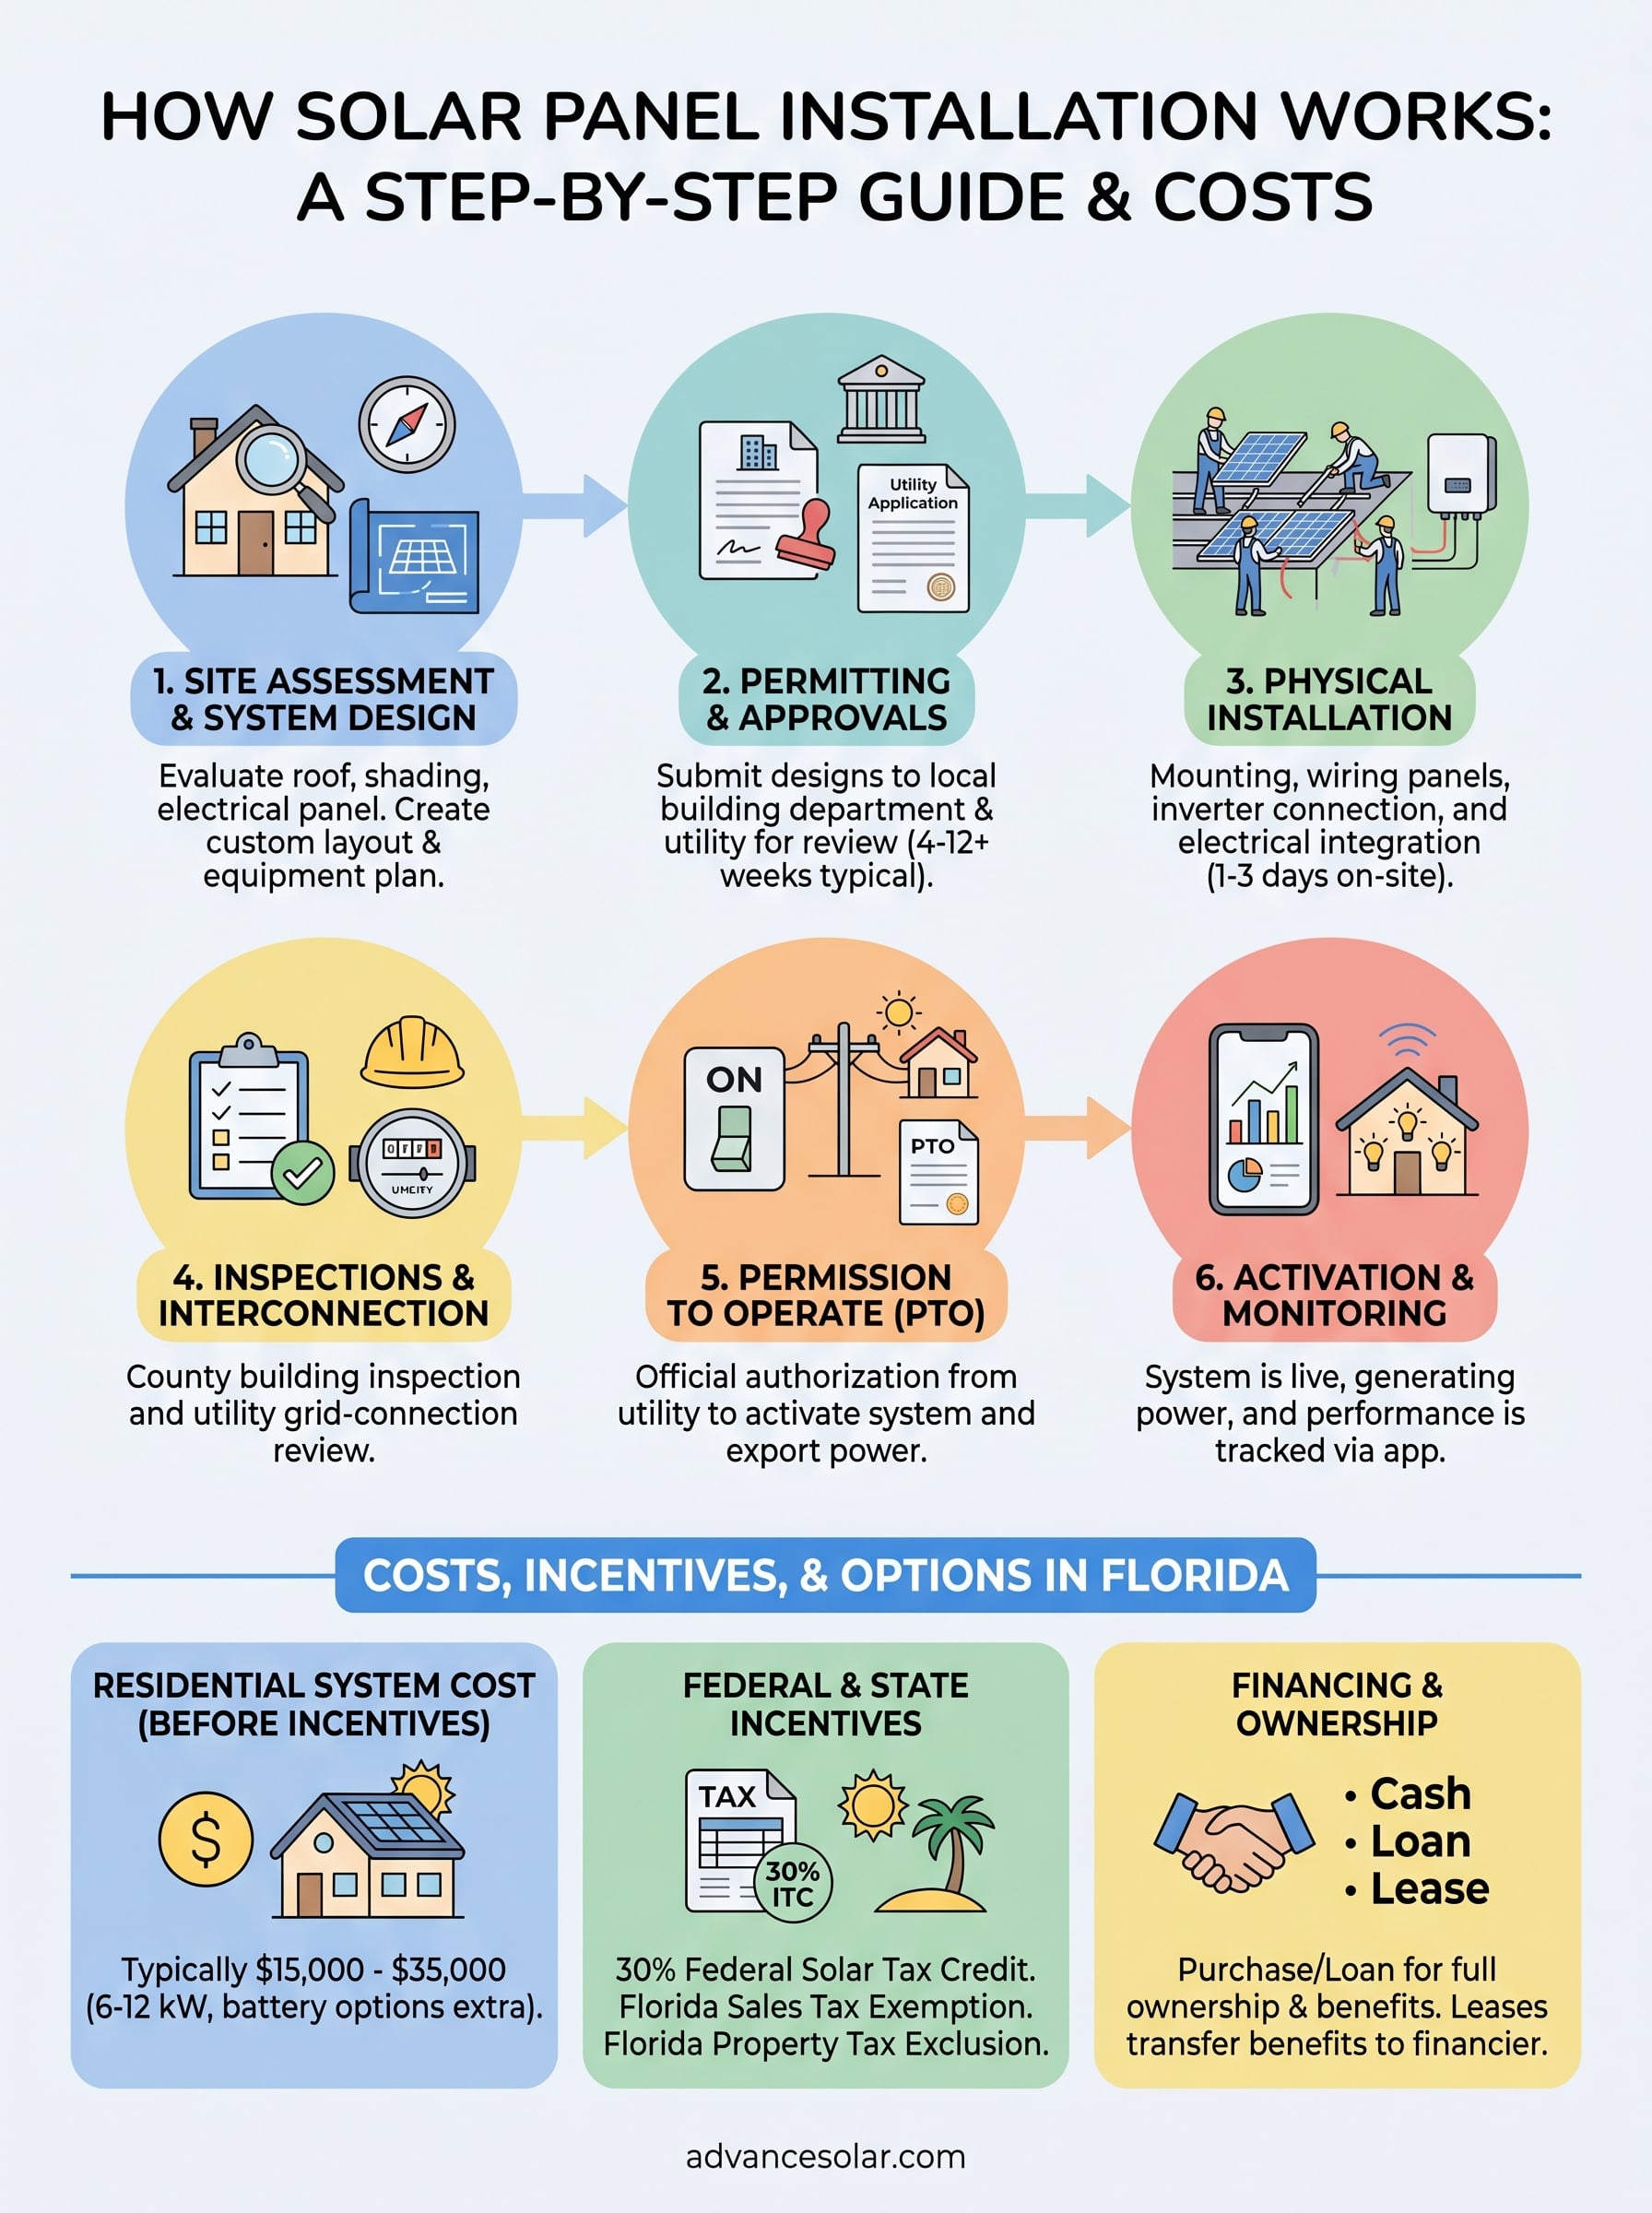
How solar panel installation works step by step
Understanding how solar panel installation works at the ground level means knowing the sequence of physical tasks your installer completes before your system produces a single watt. The process breaks into three core stages: site preparation and system design, physical panel mounting, and electrical integration. Each stage builds on the one before it, so skipping or rushing any phase creates problems that compound later.
Step 1: Site assessment and system design
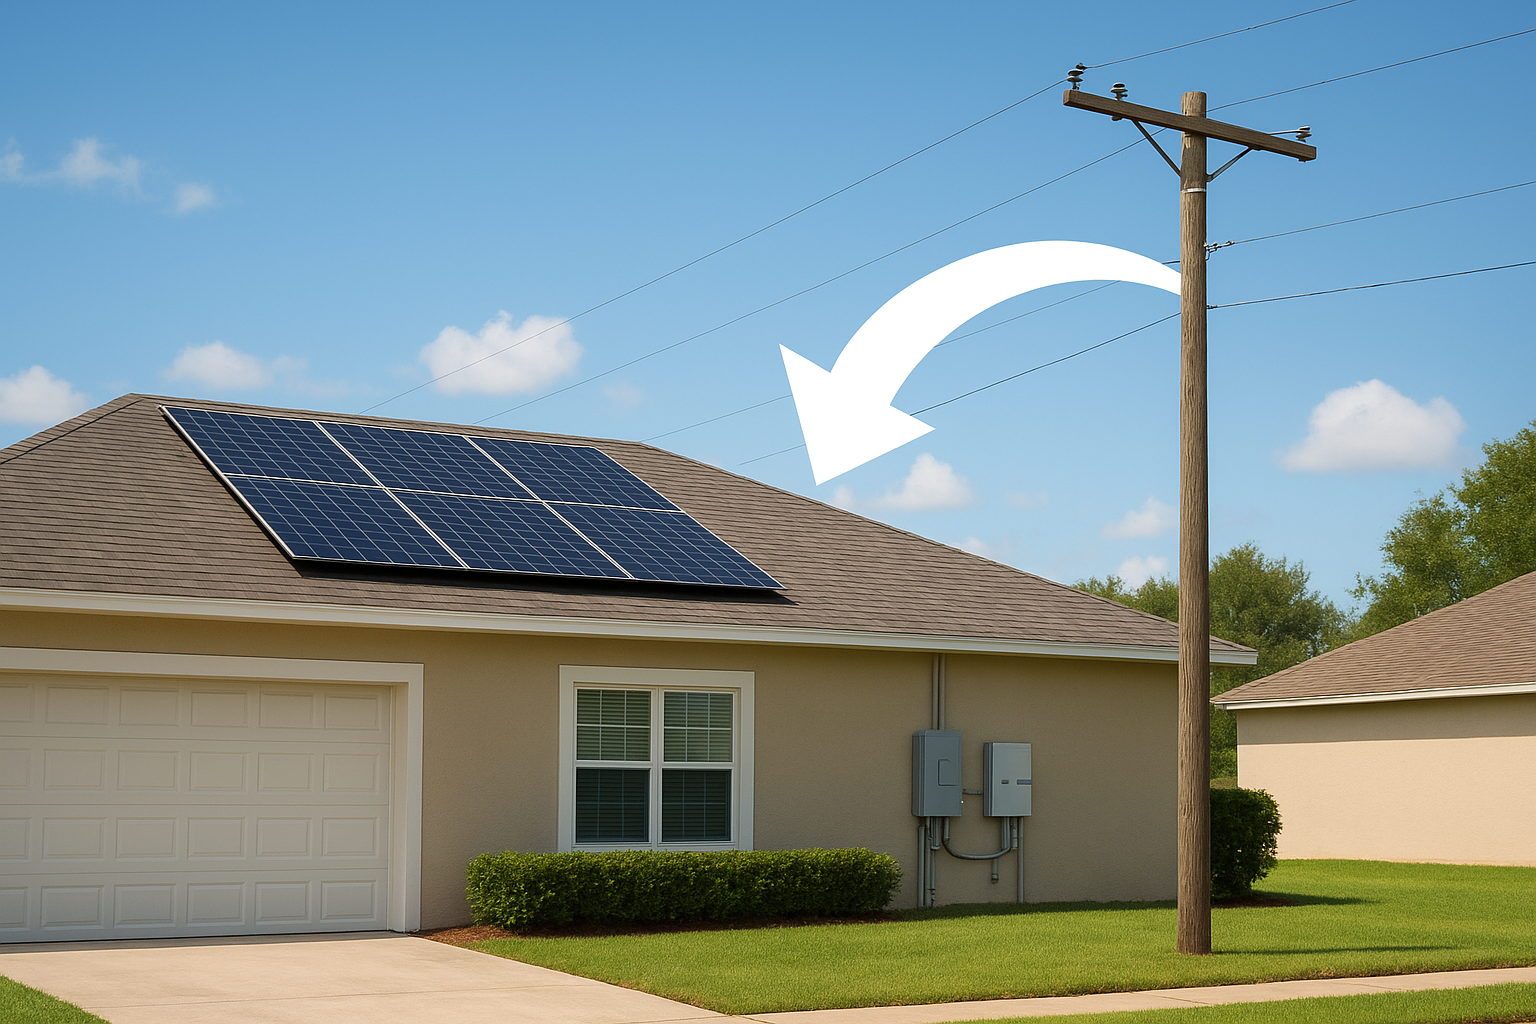
Before your installer orders a single panel, they need accurate data about your specific property. A qualified technician evaluates your roof’s structural condition, measures pitch and orientation, identifies shading sources like trees or neighboring structures, and reviews your current electrical panel’s capacity. This information feeds directly into the system design, which determines how many panels you need, where they’ll sit on your roof, and which equipment will handle power conversion and storage.
Your installer then produces a detailed system layout drawing that goes to your local building department with the permit application. This drawing is a legal requirement that specifies equipment specs, mounting hardware, and electrical diagrams. Without an accurate design based on a real site visit, your permit application will stall or get rejected outright.
Skipping a proper site assessment is the single most common reason residential solar systems underperform relative to original production estimates.
Step 2: Racking, panels, and electrical integration
Once permits are approved, your installation crew arrives to mount the racking system directly to your roof rafters. Racking is the metal framework that holds your panels at the correct angle and transfers their weight safely to your home’s structure. After the racking goes up, crews attach the panels and run DC wiring from each panel down to the inverter location, typically in your garage or utility room.

Your electrician then connects the inverter to your home’s main electrical panel, installs a dedicated solar disconnect switch as required by code, and wires in any battery storage hardware if your system includes it. A production meter or monitoring device also gets installed at this stage, giving you real-time visibility into how much electricity your system generates each day. Most residential installations take one to three days of physical work on your property once permits clear.
Permits, inspections, and permission to operate
The permitting and inspection phase is the part of how solar panel installation works that most homeowners don’t see, but feel in the form of waiting. Once your panels are mounted and your electrical work is complete, your system legally cannot operate until it passes local building inspections and receives formal approval from your utility company. This phase is not a bureaucratic formality; it’s the step that protects your home, your warranty, and your grid connection.
What your installer submits to the building department
Your installer files a permit application with your county’s building department before any physical work begins. That application includes your system design drawings, equipment specifications, and electrical diagrams. Building departments review these documents to confirm the proposed installation meets Florida Building Code requirements and any local amendments. Approval timelines vary by county; some process permits in a few business days while others take three to four weeks.
After physical installation is complete, a county building inspector visits your property to verify the work matches the approved permit drawings. They check racking attachment points, wiring methods, the disconnect switch, and the electrical panel connections. If everything passes, they sign off and your installer can move forward with the utility application.
The utility interconnection process
Your utility company has its own separate approval process called interconnection review. Your installer submits an application to connect your system to the grid, and the utility evaluates whether the local infrastructure can handle your system’s output. This review can take anywhere from one to six weeks, depending on your utility provider and how backed up their application queue is.
Working with an installer who has experience filing interconnection applications with your specific utility provider cuts down on back-and-forth delays that can add weeks to your timeline.
Getting permission to operate
Once both the building department and your utility company approve your system, the utility installs a new bidirectional meter and issues your permission to operate (PTO). This is the official authorization to turn your system on. Only after receiving PTO can you legally start generating power and earning net metering credits on your utility bill.
Your installer should walk you through your monitoring platform at this point so you can verify daily production figures, confirm your system is performing as designed, and catch any performance issues early before they affect your energy savings.
Costs, incentives, and options in Florida
Florida homeowners typically pay between $15,000 and $35,000 for a complete residential solar installation before incentives, depending on system size, equipment tier, and whether you add battery storage. Understanding how solar panel installation works financially is just as important as understanding the physical process, because the total cost you pay out of pocket is significantly lower than the sticker price once available incentives are applied.
What a residential system costs in Florida
Most Florida homes need between 6 and 12 kilowatts of solar capacity to offset the majority of their utility bill. A 6 kW system using standard equipment lands around $15,000 to $18,000 before incentives, while a 10 kW system with battery backup can run $28,000 to $40,000 depending on the battery configuration. These ranges shift based on your roof type, equipment brand, and your installer’s labor rates.
Federal and state incentives that reduce your cost
The federal Investment Tax Credit (ITC) currently lets you deduct 30% of your total system cost from your federal income tax liability. On a $20,000 system, that’s a $6,000 reduction in what you owe the IRS, not a deduction from your taxable income but a direct credit against your tax bill. Florida also exempts solar equipment from state sales tax and excludes the added home value a solar system creates from your property tax assessment, so you get the financial benefit of increased home value without a higher property tax bill.
You must have the system installed and operational within the tax year to claim the federal credit for that filing year, so timing your project matters if you’re counting on the credit for a specific return.
Financing and ownership options available to you
Purchasing your system outright or financing it through a solar loan gives you full ownership of the equipment and access to all applicable tax credits. Loan terms typically range from 5 to 25 years, and many homeowners see monthly loan payments that are lower than their previous utility bills, making the switch cash-flow positive from day one.
Lease arrangements and power purchase agreements are also available, but they transfer ownership of the tax credits to the financing company rather than you. If maximizing long-term financial return matters to your household, ownership is the stronger option in most cases.
Key takeaways and next step
Solar panel installation follows a clear sequence: site assessment, system design, permitting, physical installation, inspection, and utility activation. Each phase has a defined purpose, and skipping any step creates problems that cost you time and money. Understanding how solar panel installation works gives you the confidence to evaluate proposals accurately, compare installers on equal terms, and hold your contractor accountable at every stage of the project.
Florida homeowners who act now lock in the federal 30% tax credit along with Florida’s property tax and sales tax exemptions before those policies shift. If you’re ready to get an accurate picture of what a system designed for your specific home would cost and produce, contact the team at Advance Solar & Spa for a no-obligation energy assessment. More than 50,000 installations and over 40 years of Florida experience back every recommendation we make.