Dirty solar panels don’t just look neglected, they produce less energy. Dust, pollen, bird droppings, and the salt air common across Florida’s coasts can form a film that blocks sunlight and reduces panel efficiency by up to 25%. If you’ve invested in a solar energy system, knowing the best way to clean solar panels is one of the simplest things you can do to protect that investment and keep your electricity savings on track.
At Advance Solar & Spa, we’ve installed and maintained solar systems across Florida for over 40 years. Our technicians see firsthand what happens when panels go uncleaned season after season, and they also see the damage caused by homeowners who use the wrong tools or cleaning products. Pressure washers, abrasive scrubbers, and harsh chemicals can scratch glass coatings or void warranties. Proper technique matters just as much as frequency.
This guide covers everything you need to clean your panels safely and effectively at home, from the right soap and water mix to the tools that won’t cause damage, step-by-step cleaning instructions, and the safety precautions you shouldn’t skip when working on a roof. We’ll also help you recognize when it’s time to call in a professional crew instead.
When to clean and what you need
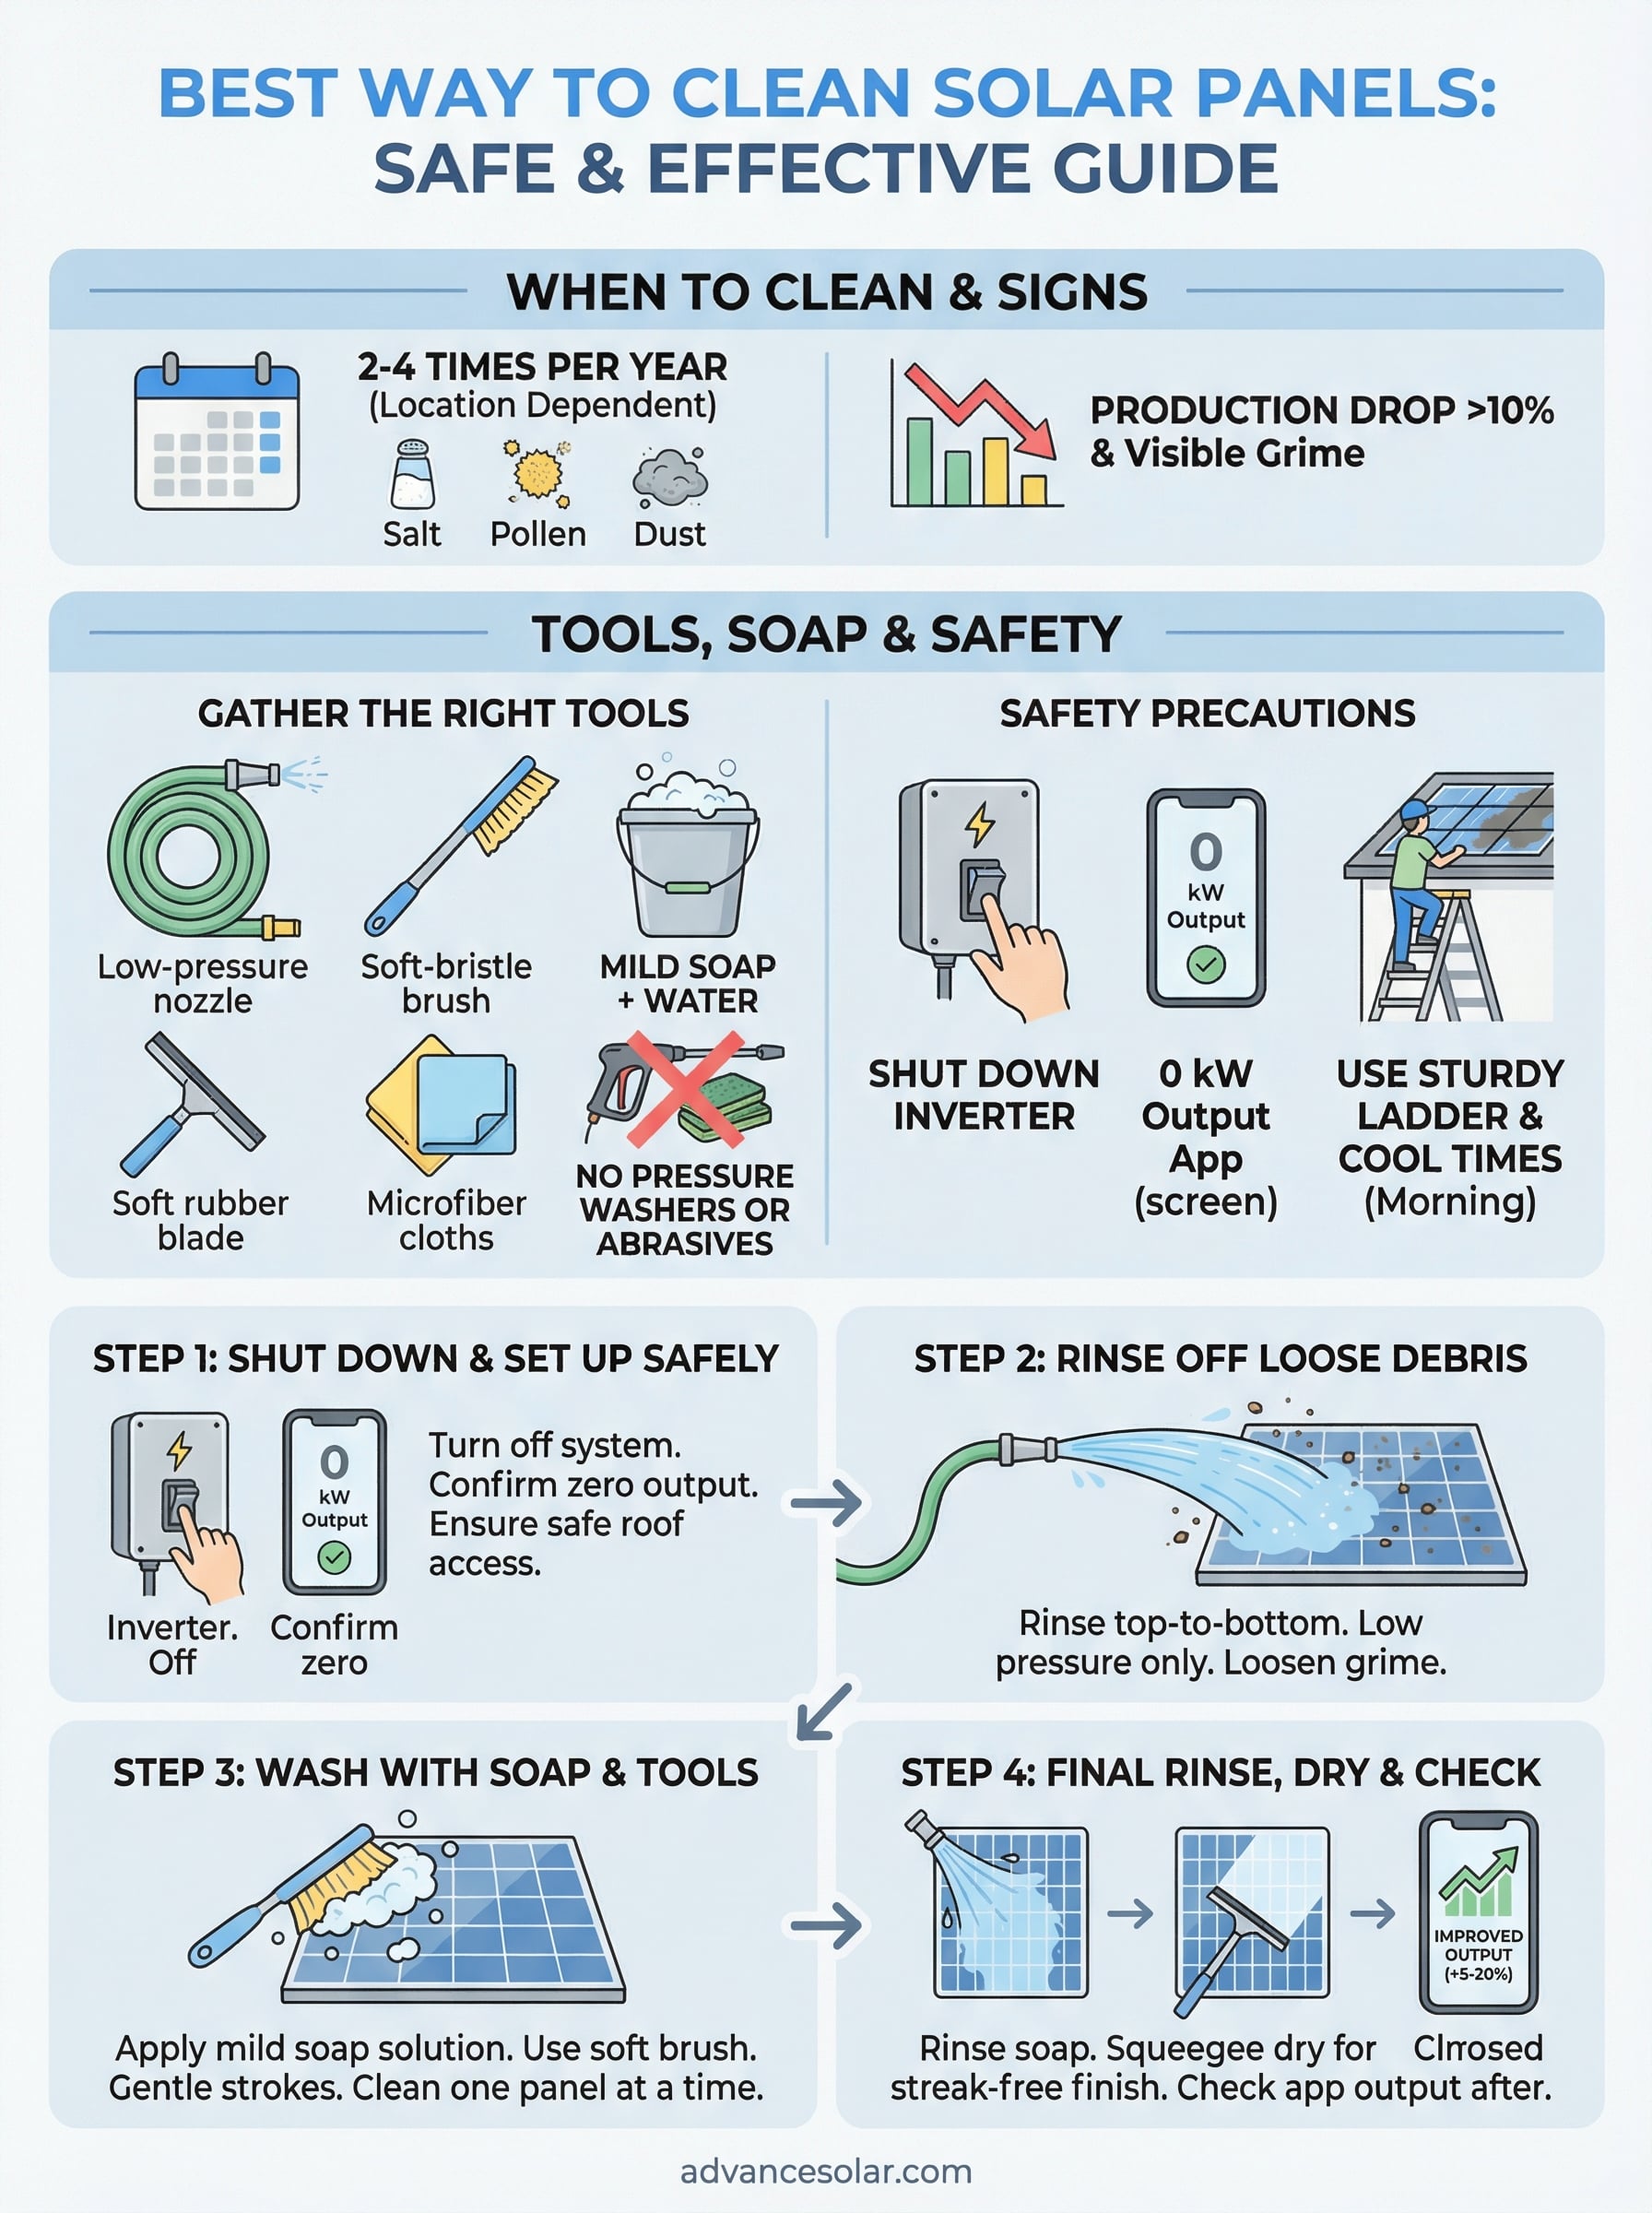
Most solar panels in Florida need cleaning two to four times per year, but that number shifts depending on your location and the season. Coastal properties near Fort Myers, Naples, or Fort Lauderdale deal with salt air deposits that build up faster than inland areas. Spring brings heavy pollen that coats panel surfaces quickly, and summer storms can leave behind dust and organic debris even after rain washes through. A quick visual check each month helps you catch buildup before it cuts into your output. If you notice a visible film, streaks, or a measurable drop in your system’s production data, that’s your signal to act.
Monitoring your system’s daily output through your inverter app is one of the easiest ways to catch panel efficiency loss before it compounds over weeks.
How to know it’s time to clean
Your inverter or monitoring app gives you the clearest signal. Production drops of 10% or more compared to a similarly sunny period usually point to dirty panels, shading, or a system issue worth investigating. Florida’s spring pollen season (roughly February through April) and post-storm periods are the two times you’ll most often notice a sharp dip in numbers. If you’ve had birds roosting near your array, check panels sooner rather than later. Bird droppings concentrate on a small surface area but block a disproportionate amount of light, making them one of the more damaging forms of buildup despite their small footprint.
What tools and supplies to gather
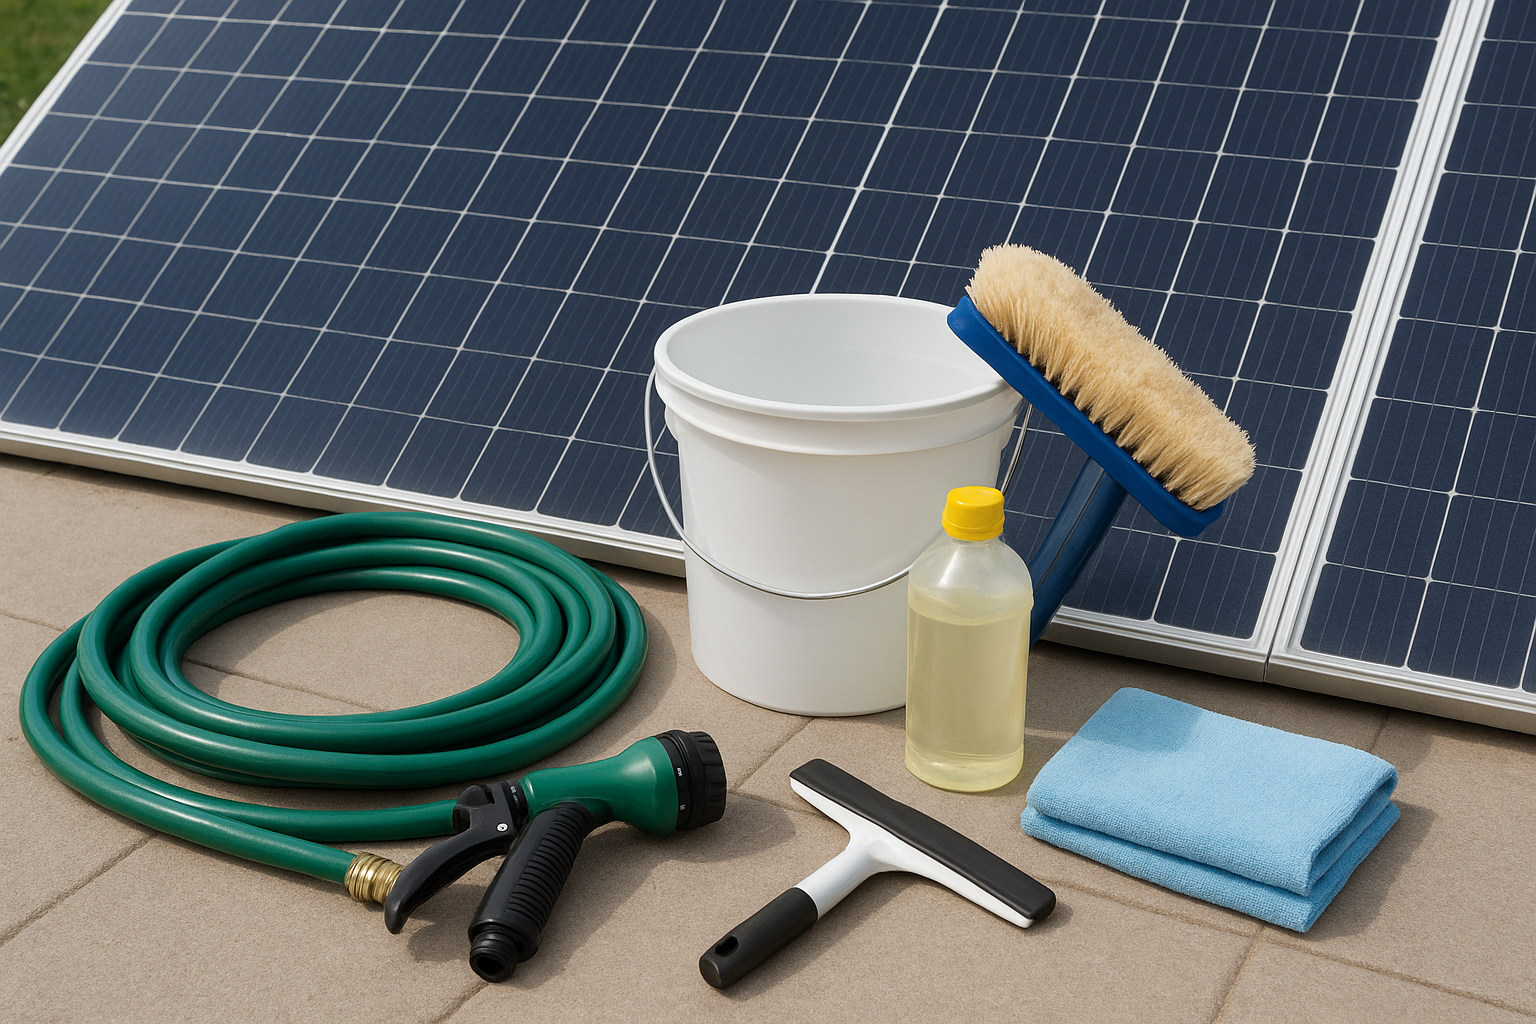
Pulling the right gear together before you head to the roof saves time and protects your equipment. The best way to clean solar panels always starts on the ground with the right kit. Here’s what you’ll need:
| Item | What to Look For |
|---|---|
| Garden hose with adjustable nozzle | Low-pressure spray setting only |
| Soft-bristle brush or sponge | Long-handled, non-abrasive |
| Bucket | For mixing your cleaning solution |
| Mild dish soap | A few drops, unscented, no degreasers |
| Squeegee with soft rubber blade | Optional but helpful for a streak-free finish |
| Microfiber cloths | For spot drying at panel edges |
Avoid pressure washers entirely. The force can crack panel glass, push water into junction boxes, and void your manufacturer’s warranty in a single pass. Skip any cleaning product that contains ammonia, bleach, or abrasive particles. A few drops of gentle dish soap mixed into a bucket of lukewarm water is all the cleaning solution you need, and it won’t damage glass coatings or leave a residue that attracts more dust.
Step 1. Shut down and set up safely
Before you touch a panel or pick up a hose, you need to shut your solar system down. Solar panels generate electricity whenever sunlight hits them, which means they’re live even on a cloudy day. Cleaning an active array with water creates a real shock hazard, and skipping this step is where most DIY injuries happen. Take the shutdown seriously before anything else.
How to shut down your solar system
Your inverter is the starting point. Most modern inverters, including those from Enphase and Tesla, have a clearly labeled shutdown switch or a setting in their companion app that lets you put the system into a safe, non-operational state. Look for a "Rapid Shutdown" switch or breaker, which is now required on most residential installations in the US. Flip it, then wait two to three minutes before you approach the panels.
If you’re unsure how to shut down your specific system, check your inverter’s manual or contact your installer before you proceed.
Once the system is off, confirm the shutdown by checking your monitoring app to verify that production output reads zero. This takes under a minute and removes any doubt before you get on the roof.
Setting up safe access to the roof
Getting to your panels safely is just as important as the best way to clean solar panels once you’re up there. Use a sturdy, properly rated ladder and position it on level ground with a second person holding the base whenever possible. Wear rubber-soled shoes with good grip, and avoid working on the roof in direct midday sun when panel surfaces can exceed 140 degrees Fahrenheit. Early morning is the safest and most effective time to clean because panels are cool, dew has softened surface grime, and you avoid direct sun glare that makes streaks harder to spot.
Step 2. Rinse off loose debris first
The first thing you do with water is rinse, not scrub. Rubbing dry debris across a panel surface before it’s been wet is one of the fastest ways to leave fine scratches in the glass, and those scratches accumulate over time. A proper rinse loosens dust, pollen, and loose bird dropping residue so that when you bring in your soft brush, you’re lifting grime rather than dragging it.
Angle and pressure matter
Start from the top of the panel and work downward, letting gravity carry loosened debris off the surface rather than pushing it back across the glass. Keep your hose nozzle on a wide, low-pressure spray setting and hold it at least two feet from the panel surface.
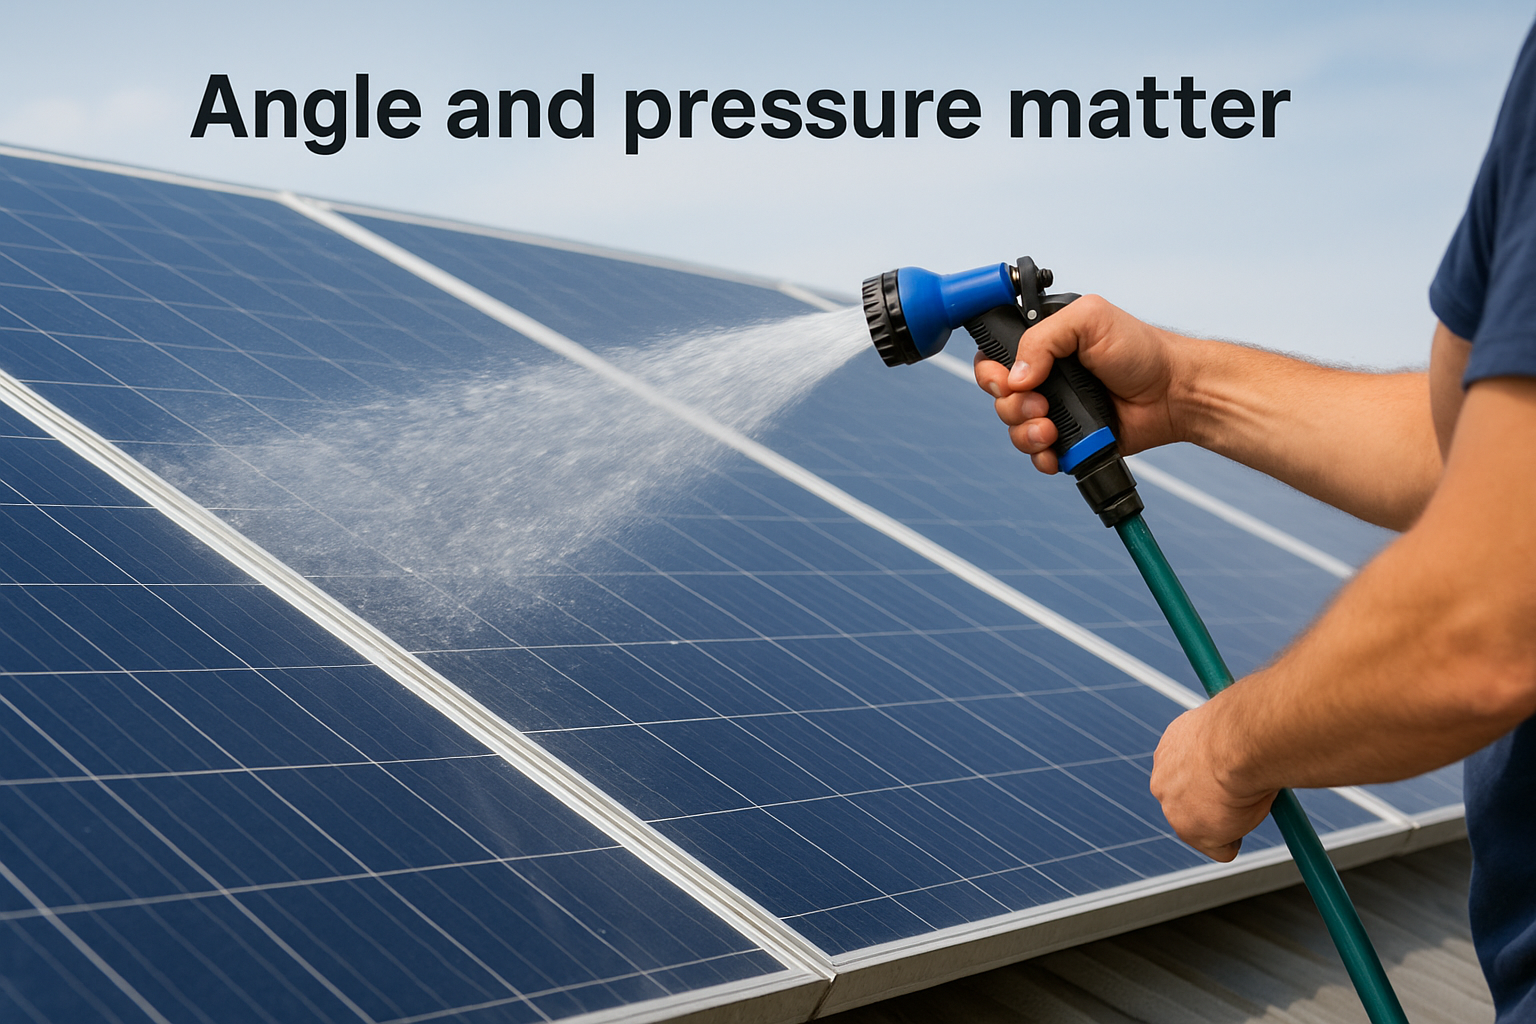
Getting too close increases water pressure at the point of contact and can force water into panel edges or frame seams. Even at a safe distance, you should never direct the spray into connectors, junction boxes, or the gap between the panel frame and the roof mount.
Never spray water directly into panel frames or junction boxes, even at low pressure, since moisture intrusion in those areas can cause electrical faults that don’t show up immediately.
What a proper rinse looks like in practice
The best way to clean solar panels always starts with a rinse that covers every section of the array, not just the spots with visible buildup. Move in horizontal passes from one side to the other so you don’t re-deposit debris onto already-rinsed sections.
If you’re dealing with dried bird droppings or caked pollen, let the water soak the spot for 30 to 60 seconds before moving on. Trying to blast them off with a harder spray damages the glass faster than it removes the stain. Patience here protects your panels and keeps the next cleaning step much easier.
Step 3. Wash with the right soap and tools
With loose debris rinsed away, you’re ready to wash. Dip your soft-bristle brush or sponge into your soap-and-water mix and apply it in smooth, overlapping strokes from the top of each panel down to the bottom. Work one panel at a time so the solution doesn’t dry on the surface before you rinse it off. Dried soap leaves a residue that attracts dust faster than a clean glass surface, which defeats the purpose of the whole job.
The best way to clean solar panels is always the gentlest method that gets the panel clean, not the fastest one.
How to mix your cleaning solution
Your cleaning solution doesn’t need to be complicated. A few drops of mild, unscented dish soap in a full bucket of lukewarm water is the right formula. Avoid hot water because it can thermal shock cool glass in the early morning when surface temperatures are lower. Here’s a simple reference for what to use and what to skip:
| Use This | Avoid This |
|---|---|
| Mild dish soap (unscented) | Bleach or bleach-based cleaners |
| Lukewarm water | Ammonia-based glass cleaners |
| Soft sponge or long-handled brush | Abrasive scrubbing pads |
| Squeegee with soft rubber blade | Metal scrapers or hard plastic tools |
How to scrub without damaging the glass
Apply your solution with light, circular or horizontal strokes rather than hard back-and-forth pressure. Solar panel glass has an anti-reflective coating that scratches more easily than standard window glass, so the pressure you’d use on a car windshield is too much here.
Pay extra attention to panel edges and corners, where grime collects inside the frame channel. A soft sponge angled into those spots picks up buildup without requiring extra force or additional tools.
Step 4. Final rinse, dry, and check performance
Once you finish washing each panel, do a second rinse across the entire array before any soap has a chance to dry on the surface. Move from the top of each panel to the bottom, using the same wide, low-pressure spray you used in step two. This final pass removes every trace of your cleaning solution and leaves the glass ready to dry without residue.
How to rinse and dry without leaving streaks
Your squeegee is the right tool here. Pull it in one smooth stroke from the top edge to the bottom, then wipe the blade with a microfiber cloth before the next pass. Overlapping each stroke slightly prevents the thin water film that causes streaks once the sun hits the glass. If you don’t have a squeegee, let panels air dry in the shade rather than wiping them with a towel, since fabric fibers can leave lint that attracts dust almost immediately.
The best way to clean solar panels always ends with a streak-free surface, because streaks act like a partial filter on incoming sunlight and reduce output almost as much as the original grime did.
How to check your system output after cleaning
Open your inverter’s monitoring app within 24 hours of cleaning on a clear, sunny day and compare current production numbers to the same day type from the previous week or the same period last month. You should see a measurable uptick. A realistic post-cleaning improvement runs between 5% and 20% depending on how dirty your panels were before you started.
If output stays flat or keeps dropping after cleaning, the problem isn’t dirt. Shading from new tree growth, a failing microinverter, or a wiring issue inside the array all look similar on a production graph. At that point, a professional inspection is the next step rather than another cleaning pass.
Keep your panels producing
The best way to clean solar panels is also the most straightforward: use gentle tools, the right soap, and a consistent schedule. Two to four cleanings per year keeps most Florida systems running near their peak output, and each session takes less than an hour once you have your gear ready. Stick with that rhythm and your panels will keep converting sunlight into savings rather than losing ground to buildup you could clear in a morning.
When output stays low after a thorough cleaning, or when your system needs professional attention for repairs, our team is ready to help. Advance Solar & Spa has completed over 50,000 installations across Florida and brings more than 40 years of hands-on experience to every service call. We inspect arrays, identify real performance issues, and handle any maintenance your system needs. Schedule a solar service visit with Advance Solar & Spa and keep your investment working the way it should.